シフト幅を変更できるリスト一括比較
こんな感じの比較。2つ先とか⁺3つ先とかシフト幅を変更できる。

プログラム
def compair(x, y, y_shift, negative=0, na=None):
    '''
    リストを利用した一括の比較
    x[i]<=y[i+y_shift]の結果のリストを返す。
    Trueのときには1
    Falseの時にはnegativeの値が入る。
    比較する値がない場合は、naの値が入る。
    '''
    if len(x) != len(y):
        raise
    elif abs(y_shift) >= len(x):
        raise

    z = [na] * len(x)

    if y_shift < 0:
        for i in range(len(x) + y_shift):  # y_shiftは負の数なので、ループ回数は減る。
            if x[i - y_shift] is None:
                z[i - y_shift] = na
            elif y[i] is None:
                z[i - y_shift] = na
            elif  x[i - y_shift] <= y[i]:
                z[i - y_shift] = 1
            else:
                z[i- y_shift] = negative
    else:
        for i in range(len(x) - y_shift):
            if x[i] is None:
                z[i] = na
            elif y[i + y_shift] is None:
                z[i] = na
            elif x[i] <= y[i + y_shift]:
                z[i] = 1
            else:
                z[i] = negative
    return z

def compair_offset(x, y, y_shift, y_offset, negative=0, na=None):
    '''
    yの値は、xより、y_offset以上大きい場合。
    '''
    for i in range(len(y)):
        y[i] = y[i] - y_offset

    z = compair(x, y, y_shift, negative, na)
    return z


if __name__ == "__main__":

    x = [3, 1, 4, 1, 5, 9, 2, 6, 5, 3, 5, 9]
    y = [2, 7, 1, 8, 2, 8, 1, 8, 2, 8, 4, 6]

    print(compair(x, y, 0))
    print(compair(x, y, 1))

    print(compair(x, y, 2))
    print(compair(x, y, 10))
    print(compair(x, y, 11))

    print(compair(x, y, -1))
    print(compair(x, y, -2))
    print(compair(x, y, -10))
    print(compair(x, y, -11))

    print(compair(x, y, 3, na=0))
    print(compair(x, y, -3, negative=0))

    print(compair_offset(x, y, y_shift=0, y_offset=2, negative=0))

    print(compair_offset(x, y, y_shift=2, y_offset=2, negative=0))
結果
[0, 1, 0, 1, 0, 0, 0, 1, 0, 1, 0, 0]
[1, 1, 1, 1, 1, 0, 1, 0, 1, 1, 1, None]
[0, 1, 0, 1, 0, 0, 1, 1, 0, 1, None, None]
[1, 1, None, None, None, None, None, None, None, None, None, None]
[1, None, None, None, None, None, None, None, None, None, None, None]
[None, 1, 1, 1, 1, 0, 1, 0, 1, 0, 1, 0]
[None, None, 0, 1, 0, 0, 1, 1, 0, 1, 0, 0]
[None, None, None, None, None, None, None, None, None, None, 0, 0]
[None, None, None, None, None, None, None, None, None, None, None, 0]
[1, 1, 1, 1, 1, 0, 1, 0, 1, 0, 0, 0]
[None, None, None, 1, 1, 0, 1, 0, 1, 0, 1, 0]
[0, 1, 0, 1, 0, 0, 0, 1, 0, 1, 0, 0]
[0, 1, 0, 1, 0, 0, 0, 0, 0, 0, None, None]
テーブルの定義とデータをファイルに。インポートとエクスポート。
テーブルの定義とデータをファイルに。インポートとエクスポート。
import sqlite3
import datetime
import os
import csv

import time # ダミーデータを作るときのsleep用。

class tabledata_file_converter():
    """テーブルの情報をファイルに書き出す、ファイルからテーブルを復元する
    """
    @staticmethod
    def get_table_definition_from_sqlite_master(db_cursor, table_name):
        # dbmsからテーブル定義の情報を取得する
        sql = f"select sql from sqlite_master where type='table' and name='{table_name}'"
        db_cursor.execute(sql)
        row = db_cursor.fetchone()
        if row is None:
            raise
        return row[0]

    @staticmethod
    def build_fullpath_table_def_file(table_name, folder_path=None):
        # テーブル定義を書き込むファイルのパスを作る
        post_fix="_table_def.txt"
        if folder_path is None:
            file_fullpath = os.path.dirname(os.path.abspath(__file__)) + os.sep + table_name + post_fix
        else:
            file_fullpath = folder_path + os.sep + table_name + post_fix
        return file_fullpath

    @staticmethod
    def build_fullpath_table_dat_csv(table_name, folder_path=None):
        # テーブルのデータを書き込むファイルのパスを作る
        post_fix="_table_dat.csv"
        if folder_path is None:
            file_fullpath = os.path.dirname(os.path.abspath(__file__)) + os.sep + table_name + post_fix
        else:
            file_fullpath = folder_path + os.sep + table_name + post_fix
        return file_fullpath

    @staticmethod
    def save_def_file(table_name, table_definition, folder_path=None):
        # テーブル定義をファイルに書き込む
        save_file_fullpath = tabledata_file_converter.build_fullpath_table_def_file(table_name, folder_path)

        with open(save_file_fullpath, mode='w', encoding='utf-8') as f:
            f.write(table_definition)

    @staticmethod
    def read_from_def_file(table_name, folder_path=None):
        # テーブル定義をファイルから読み出す。
        read_file_fullpath = tabledata_file_converter.build_fullpath_table_def_file(table_name, folder_path)

        if os.path.isfile(read_file_fullpath) is False:
            raise

        with open(read_file_fullpath, mode='r', encoding='utf-8') as f:
            row = f.readline()
        return row

    @staticmethod
    def is_exist_table(db_cursor, tale_name):
        #テーブルの存在確認
        db_cursor.execute(f'SELECT COUNT(*) FROM sqlite_master WHERE TYPE="table" AND NAME="{tale_name}"')
        if db_cursor.fetchone() == (0,): #存在しないとき
            return False
        else:
            return True

    @staticmethod
    def list_to_sql_str(list_data):
        '''
        list_to_sql_str(["hoge", 3, 0.14])
        "'hoge',3,0.14"
        '''
        y=[]
        for item in list_data:
            if type(item) is str:
                y.append("'"+item+"'")
            else:
                y.append(str(item))

        return ','.join(y)

    @staticmethod
    def load_from_csv(db_cursor, table_name, folder_path=None):
        # ファイル(データと定義)からテーブルを復元する

        # テーブルの有無確認 テーブルがあればエラー終了させる
        if __class__.is_exist_table(db_cursor, table_name) is True:
            raise

        # テーブルを定義する
        table_def_sql = __class__.read_from_def_file(table_name)
        db_cursor.execute(table_def_sql)

        read_file_fullpath = __class__.build_fullpath_table_dat_csv(table_name, folder_path)

        f = open(read_file_fullpath,mode='r',encoding='utf-8', newline='')
        csv_reader = csv.reader(f, delimiter=',', quotechar='"', lineterminator='\n')

        for row in  csv_reader:
            insert_sql = f"INSERT INTO {table_name} VALUES({ __class__.list_to_sql_str(row)})"
            db_cursor.execute(insert_sql)

    @staticmethod
    def save_csv(db_cursor, table_name, folder_path=None):
        save_file_fullpath=tabledata_file_converter.build_fullpath_table_dat_csv(table_name=table_name, folder_path=folder_path)

        f = open(save_file_fullpath,mode='w',encoding='utf-8', newline='')
        csv_writer = csv.writer(f, delimiter=',', quotechar='"', lineterminator='\n')

        for row in db_cursor.execute(f'SELECT * FROM {table_name}'):
            csv_writer.writerow(row)

        f.close()


if __name__ == '__main__':
    con = sqlite3.connect(":memory:", check_same_thread=False)
    con.isolation_level = None

    cur = con.cursor()
    cur.execute('PRAGMA temp_store=MEMORY;')
    cur.execute('PRAGMA journal_mode=MEMORY;')

    # Create table
    cur.execute('CREATE TABLE stocks (date text, ts timestamp, trans text, symbol text, qty real, price real, add_col integer)')

    # ダミーデータを作る
    for i in range(100):
        # Insert a row of data
        now = datetime.datetime.now()
        cur.execute("INSERT INTO stocks VALUES ('2006-01-05',?,'BUY','RHAT',100,35.14,?)", (now, str(i)))
        time.sleep(0.01)

    # 新しいほうから3件だけを表示する。
    for row in cur.execute("SELECT * From stocks ORDER BY add_col DESC LIMIT 3"):
        print(row)

    # SQL定義の確認
    for row in cur.execute("select sql from sqlite_master where type='table' and name='stocks'"):
        print(row)

    table_definision = tabledata_file_converter.get_table_definition_from_sqlite_master(db_cursor=cur, table_name='stocks')
    print(table_definision)

    # テーブル定義の書き出し
    tabledata_file_converter.save_def_file(table_name='stocks', table_definition=table_definision)

    # テーブル定義の読み出し
    table_definision2 = tabledata_file_converter.read_from_def_file(table_name='stocks')
    print(table_definision2)

    # テーブルデータの書き出し
    tabledata_file_converter.save_csv(cur, "stocks")

    # テーブルの有無
    print(tabledata_file_converter.is_exist_table(cur,"stocks"))
    print(tabledata_file_converter.is_exist_table(cur, "stocksA"))

    # テーブルデータの復元(stocksA向けのファイルを事前に作っておく)
    tabledata_file_converter.load_from_csv(cur, "stocksA")

    # 復元されたデータの表示。新しいほうから3件だけを表示する。
    for row in cur.execute("SELECT * From stocksA ORDER BY add_col DESC LIMIT 3"):
        print(row)

    # 復元されたデータの表示。件数を表示する
    for row in cur.execute("SELECT COUNT(*) From stocksA ORDER BY add_col DESC LIMIT 3"):
        print(row)

    # SQL定義の確認
    for row in cur.execute("select sql from sqlite_master where type='table'"):
        print(row)
PlantUMLの配置図の位置調整
PlantUMLの配置図の、レイアウトというか位置調整がうまくいかなかったのでメモ

ソースコード
@startuml deployment-diagram

node ノード1[
    node1
]
' 2段目の左にあるブロックから記載していく。
node ノード2[
    node2
]
node ノード3[
    node3
]
node ノード4[
    node4
]

' 矢印でつなぐ
ノード1 --> ノード3 :上下関係での接続
ノード2 <- ノード3: 横関係での接続(左向き)
ノード3 -> ノード4: 横関係での接続(右向き)

' ノートの記載は他の図と同じ。
note left of ノード1 : 親のノード

@enduml
Python サブモジュールのディレクトリ構造とunittestの話
プログラムとunittestを同じディレクトリに置くパタンのテスト。
パッケージ(hello_submodule)の同列にtestディレクトリを作って、unittestのファイルを置く構成が標準らしいが、パスの設定関係がとても面倒なので。
プログラムとunittestを同じディレクトリに置くパタンの場合、カレントディレクトリがhello_submoduleにあるものとしてfromなどを記述すればよさそう。
ディレクトリ構造
─hello_submodule
  │  program_main.py
  │  program_main_test.py
  │
  ├─.vscode
  │      launch.json
  │      settings.json
  │
  ├─sub_module_1
  │      program_submod1.py
  │      program_submod1_test.py
  │      __init__.py
  │
  └─sub_module_2
          program_submod2.py
          program_submod2_test.py
          __init__.py
ソースコード
1. program_main.py
from sub_module_1 import program_submod1
from sub_module_2.program_submod2 import Class_Submod2

def main_func():
    x = program_submod1.func1()
    y = Class_Submod2()
    z = y.func2()

    print("this function is program_main.main_func()")
    print(f"x={x}, y={y},z={z}")

    return 3

if __name__ == '__main__':
    main_func()
2. program_main_test.py
import unittest
import program_main

class Testprogram_main(unittest.TestCase):

    def test_main_func(self):
        self.assertEqual(program_main.main_func(), 3)


if __name__ == '__main__':
    unittest.main()
3. program_submod1.py
def func1():
    print("this function is sub_module_1.func1()")
    return (1)
4. program_submod1_test.py
import unittest
from sub_module_1 import program_submod1

class Testprogram_submod1(unittest.TestCase):

    def test_func1(self):
        self.assertEqual(program_submod1.func1(), 1)

if __name__ == '__main__':
    unittest.main()
5. program_submod2.py
class Class_Submod2:
    def __init__(self):
        self.v = 2
        pass

    def func2(self):
        print("this function is sub_module_2.func2() in Class_Submod2")
        return (self.v)
6. program_submod2_test.py
import unittest
from sub_module_2 import program_submod2

class Testprogram_submod2(unittest.TestCase):

    def test_func1(self):
        x=program_submod2.Class_Submod2()
        self.assertEqual(x.func2(), 2)

if __name__ == '__main__':
    unittest.main()
7. __init__.py
空のファイル。
8. setting.json(vscodeの設定ファイル)
{
    "python.testing.unittestArgs": [
        "-v",
        "-s",
        ".",
        "-p",
        "*_test.py"
    ],
    "python.testing.pytestEnabled": false,
    "python.testing.nosetestsEnabled": false,
    "python.testing.unittestEnabled": true
}
コマンドラインでのテスト実行例
(base) C:\dev\SampleCodes\hello_submodule>python -m unittest discover -p "*_test.py"
this function is sub_module_1.func1()
this function is sub_module_2.func2() in Class_Submod2
this function is program_main.main_func()
x=1, y=<sub_module_2.program_submod2.Class_Submod2 object at 0x0000021BF07B07C8>,z=2
.this function is sub_module_1.func1()
.this function is sub_module_2.func2() in Class_Submod2
.
----------------------------------------------------------------------
Ran 3 tests in 0.005s

OK
||>

*** パスの設定関係がとても面倒な理由
unittestファイル側から、テスト対象の関数が書いてある.pyファイルをimportしないといけないが、親ディレクトリをたどってimportする設定が手間なため。
全てのunittestファイルに以下を記載してもよいが手間。lynterが問題として検出することもある。

>||
import sys
sys.path.append(r"<パッケージのディレクトリ>")
markdownで書いたドキュメントにPlantUMLの図を挿入する方法
markdownで書いたドキュメントにPlantUMLの図を挿入する方法。
以下、どちらも可能。
- mdファイルに直接記載する。
- PlantUMLのファイルを参照する。
これで、ファイル分割しつつ、図と説明をテキストファイルで記述できるようになった。
結果

ソースコード
■mdファイル
# Section1
直接のPlantUMLの記載を、図として挿入する。
```plantuml
@startuml
:Hello world;
:this is section1;
@enduml
```
# Section2

別ファイルにあるPlantUMLの記載を、図として挿入する。

```plantuml
!include a00_hello_world.pu
```
# Section3
終わり
■PlantUMLの記載ファイル(a00_hello_world.pu)
@startuml
:Hello world;
:This is on defined on
several **lines**;
@enduml
環境
- Java Runtime
- PlantUML (https://plantuml.com/ja/download)
- Markdown Preview Enhanced
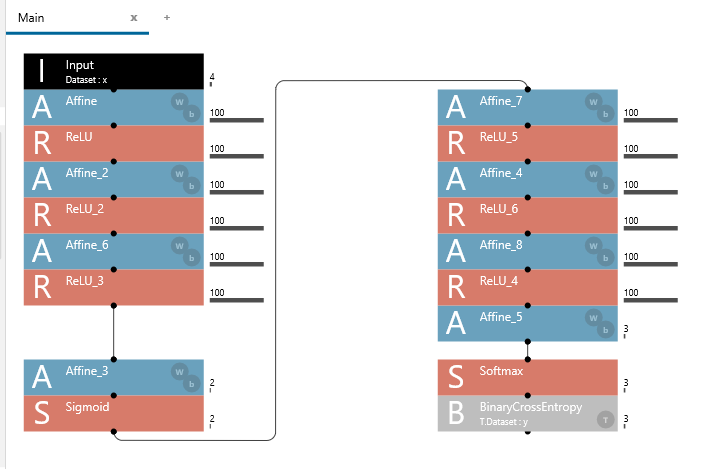
Neural Network Consoleによる学習済みニューラルネットワークの利用(その2)
識別機として作ったネットワークの中間層の値をエンコード値として使う、オートエンコーダもどきがつくりたかったのでテスト。
誤差関数には、y(OneHotにした3列のクラス値 )を入れているので、オートエンコーダではないが、実質的には同じもの
ネットワーク設計
ネットワークの設計とトレーニングはNeural Network Console(NNC)で実施。
2層では識別率が上がらなかったので、3層。
左側がエンコーダ、右側がデコーダ。
実行結果
(base) C:\dev\SampleCodes\hello_autoenc>python network.py
2020-05-23 12:39:58,407 [nnabla][INFO]: Initializing CPU extension...
2020-05-23 12:39:59,117 [nnabla][INFO]: Parameter load (<built-in function format>): C:\dev\SampleCodes\hello_autoenc\hello_autoenc.files\20200523_112705\results.nnp
入力データ(アヤメ3種類それぞれ1個づつ)
[[4.3 3.  1.1 0.1]
 [4.9 2.4 3.3 1. ]
 [4.9 2.5 4.5 1.7]]
もともとのネットワークの計算結果(エンコード+デコード)
[[9.9999666e-01 1.6275737e-06 1.6897608e-06]
 [1.0858843e-05 9.9997306e-01 1.6078509e-05]
 [1.0666966e-05 1.2271330e-02 9.8771799e-01]]
エンコードした値
[[1.8855007e-02 3.9558447e-08]
 [9.2018157e-01 1.9496704e-03]
 [9.9969387e-01 9.8213345e-01]]
エンコードされた値をもとに、デコードした値
[[9.9999666e-01 1.6275737e-06 1.6897608e-06]
 [1.0858843e-05 9.9997306e-01 1.6078509e-05]
 [1.0666966e-05 1.2271330e-02 9.8771799e-01]]
ソースコード
訓練結果のloadコマンドの引数ファイルが、2年前とは変わっていた。
import nnabla as nn
import nnabla.functions as F
import nnabla.parametric_functions as PF


def original_network(x, test=False):

    # Edit画面から、右クリック→Export→Python Code(NNC)
    # 引数yは削除
    # def original_network(x, y, test=False):
    # Input:x -> 4
    # Affine -> 100
    h = PF.affine(x, (100,), name='Affine')
    # ReLU
    h = F.relu(h, True)
    # Affine_2
    h = PF.affine(h, (100,), name='Affine_2')
    # ReLU_2
    h = F.relu(h, True)
    # Affine_6
    h = PF.affine(h, (100,), name='Affine_6')
    # ReLU_3
    h = F.relu(h, True)

    # Affine_3 -> 2
    h = PF.affine(h, (2,), name='Affine_3')
    # Sigmoid
    h = F.sigmoid(h)

    # Affine_7 -> 100
    h = PF.affine(h, (100,), name='Affine_7')
    # ReLU_5
    h = F.relu(h, True)
    # Affine_4
    h = PF.affine(h, (100,), name='Affine_4')
    # ReLU_6
    h = F.relu(h, True)
    # Affine_8
    h = PF.affine(h, (100,), name='Affine_8')
    # ReLU_4
    h = F.relu(h, True)
    # Affine_5 -> 3
    h = PF.affine(h, (3,), name='Affine_5')

    # Softmax
    h = F.softmax(h)

    # BinaryCrossEntropy
    # h = F.binary_cross_entropy(h, y)
    return h


def encorder_network(x, test=False):
    # original_networkの前半
    # Input:x -> 4
    # Affine -> 100
    h = PF.affine(x, (100,), name='Affine')
    # ReLU
    h = F.relu(h, True)
    # Affine_2
    h = PF.affine(h, (100,), name='Affine_2')
    # ReLU_2
    h = F.relu(h, True)
    # Affine_6
    h = PF.affine(h, (100,), name='Affine_6')
    # ReLU_3
    h = F.relu(h, True)

    # Affine_3 -> 2
    h = PF.affine(h, (2,), name='Affine_3')
    # Sigmoid
    h = F.sigmoid(h)

    return h


def decorder_network(x, test=False):
    # original_networkの後半
    # Input:x -> 2

    # Affine_7 -> 100
    h = PF.affine(x, (100,), name='Affine_7')
    # ReLU_5
    h = F.relu(h, True)
    # Affine_4
    h = PF.affine(h, (100,), name='Affine_4')
    # ReLU_6
    h = F.relu(h, True)
    # Affine_8
    h = PF.affine(h, (100,), name='Affine_8')
    # ReLU_4
    h = F.relu(h, True)
    # Affine_5 -> 3
    h = PF.affine(h, (3,), name='Affine_5')

    # Softmax
    h = F.softmax(h)

    return h


# https://support.dl.sony.com/docs-ja/%E3%83%81%E3%83%A5%E3%83%BC%E3%83%88%E3%83%AA%E3%82%A2%E3%83%AB%EF%BC%9Aneural-network-console%E3%81%AB%E3%82%88%E3%82%8B%E5%AD%A6%E7%BF%92%E6%B8%88%E3%81%BF%E3%83%8B%E3%83%A5%E3%83%BC%E3%83%A9/
# nn.load_parameters(‘{training result path}/results.nnp’)
nn.load_parameters(
    r"C:\dev\SampleCodes\hello_autoenc\hello_autoenc.files\20200523_112705\results.nnp")

x = nn.Variable((3, 4))
x.d = [4.3, 3, 1.1, 0.1], [4.9, 2.4, 3.3, 1], [4.9, 2.5, 4.5, 1.7]

print("入力データ(アヤメ3種類それぞれ1個づつ)")
print(x.d)

y_origin = original_network(x, test=True)
y_origin.forward()
print("もともとのネットワークの計算結果(エンコード+デコード)")
print(y_origin.d)

y_encoder = encorder_network(x, test=True)
y_encoder.forward()
print("エンコードした値")
print(y_encoder.d)

y_decoder = decorder_network(y_encoder, test=True)
y_decoder.forward()
print("エンコードされた値をもとに、デコードした値")
print(y_decoder.d)
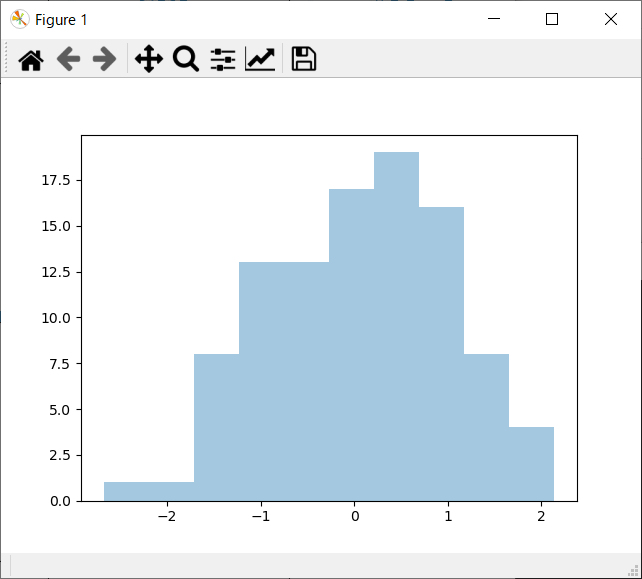
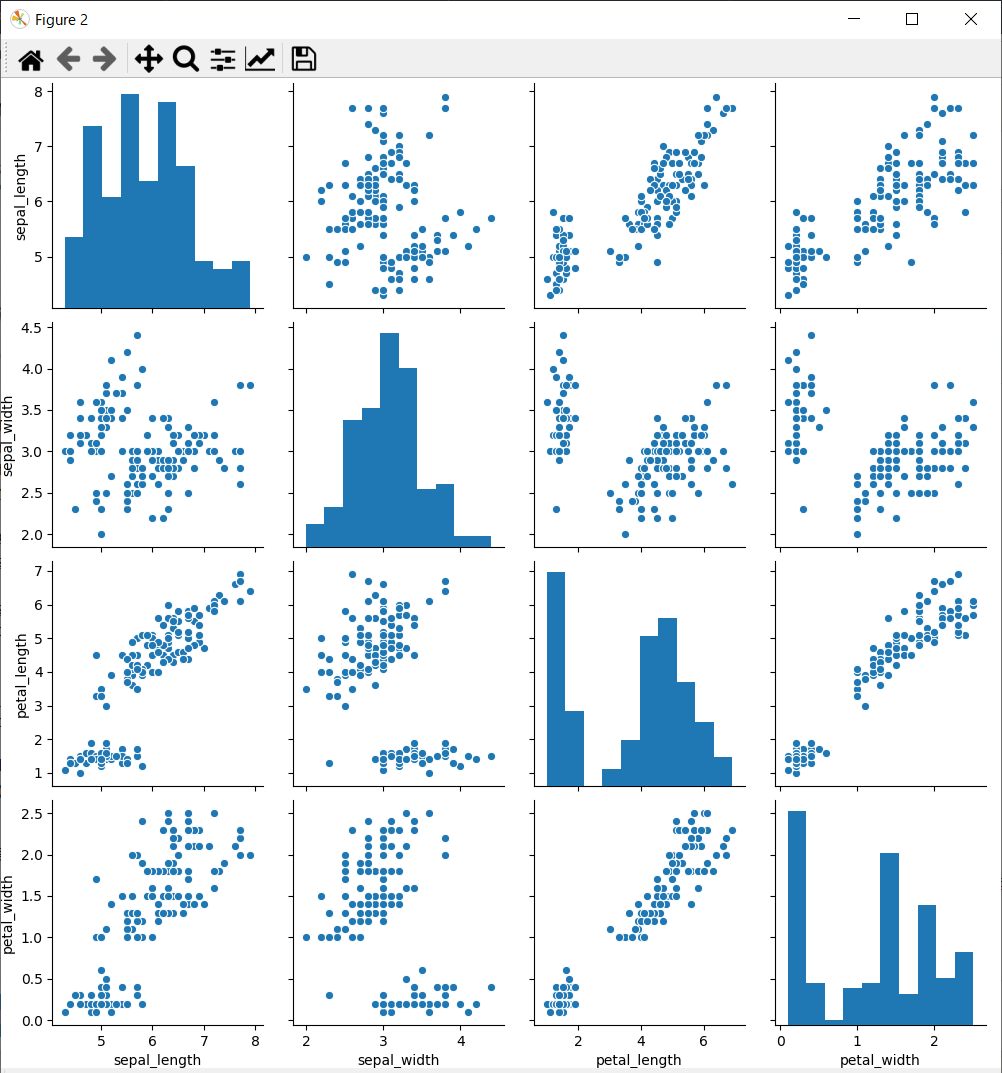
seabornを使ってみた
seabornを使ってみた。
plt.show(block=False) # これがないと表示されない。block=Falseがないとグラフを閉じるまでプログラムの実行が一時停止する。
ソースコード
import numpy as np
import seaborn as sns
from matplotlib import pyplot as plt

x = np.random.normal(size=100)
iris = sns.load_dataset("iris")

sns.distplot(x, kde=False, rug=False, bins=10)
plt.show(block=False) # これがないと表示されない。block=Falseがないとグラフを閉じるまでプログラムの実行が一時停止する。


sns.pairplot(iris)
plt.show(block=False)

# プログラムの終了とともにプロット画面も閉じてしまうので入力まち
input()
結果