pythonでの環境変数操作
クラスにしたもの
import os

class myosenv():
    def __init__(self,new_key:str, value_str=None):
        self.new_key=new_key

        key_value=os.getenv(self.new_key)

        if key_value is not None:
            print(f"{new_key} already exists.")
            print(f"{new_key}={key_value}")
            raise Exception

        if value_str is not None:
            self.set_value(value_str)

    def set_value(self, value_str:str):
        # __init__でその名前の環境変数が存在していないことは確認済み
        os.environ[self.new_key] = value_str

    def get_value(self):
        return os.getenv(self.new_key)

    def __del__(self):
        del os.environ[self.new_key]

if __name__ == '__main__':

    #env = myosenv("os")
    env = myosenv("hoge")
    env.set_value("hoge1")

    print(env.get_value())
    print(os.environ["hoge"])

    # コンストラクタでkeyとvalueを両方定義
    env_piyo = myosenv("piyo","piyo20")
    print(env_piyo.get_value())
    print(os.environ["piyo"])
基本の動作確認
コード
import os

print("\n1. 実在する環境変数")#----------------------------------
new_key="OS"
key_value=os.getenv(new_key)

if key_value is None:
    print(f"存在しない。{new_key} is {key_value}")
else:
    print(f"{new_key} is {key_value}")

print("\n2. 実在しない環境変数")#----------------------------------

new_key="hoge"
key_value=os.getenv(new_key)

if key_value is None:
    print(f"存在しない。{new_key} is {key_value}")
else:
    print(f"{new_key} is {key_value}")

print("\n3. 実在しない環境変数を新たに作る")#----------------------------------
#new_key="hoge"
#key_value=os.getenv(new_key)

if key_value is None:
    print(f"存在しない。{new_key} is {key_value}")
    new_key_value="hoge2000"
    os.environ[new_key] = new_key_value
    print(f"set {new_key} = {new_key_value}")
else:
    print(f"{new_key} is {key_value}")

print("\n4. 環境変数を新たに作った")#----------------------------------
#new_key="hoge"
key_value=os.getenv(new_key)

if key_value is None:
    print(f"存在しない。{new_key} is {key_value}")
else:
    print(f"{new_key} is {key_value}")

print("\n5. 作った環境変数を消す")#----------------------------------
del os.environ[new_key]
print(f"del os.environ[{new_key}]")

print(f"\n6. 環境変数を消した後")#----------------------------------
#new_key="hoge"
key_value=os.getenv(new_key)

if key_value is None:
    print(f"存在しない。{new_key} is {key_value}")
else:
    print(f"{new_key} is {key_value}")
実行結果
1. 実在する環境変数
OS is Windows_NT

2. 実在しない環境変数
存在しない。hoge is None

3. 実在しない環境変数を新たに作る
存在しない。hoge is None
set hoge = hoge2000

4. 環境変数を新たに作った
hoge is hoge2000

5. 作った環境変数を消す
del os.environ[hoge]

6. 環境変数を消した後
存在しない。hoge is None
classmethodとクラス変数
クラスのインスタンスを作らずにクラスの関数を実行したい場合のメモ
クラス変数であればclassmethod内で参照できる。インスタンスを作ればクラス変数も変更できる。
classmethod内では、インスタンス変数は一切参照できない。(作ったインスタンスでclassmethodを実行しても)
classmethod を使う場合、第一引数を cls とすることが慣習らしいですが、以下のコードではselfとなっています。(検証コードとして、インスタンス変数を参照できる可能性を残すため)
コード
class myclass():
    # クラス変数
    val_class=1

    def __init__(self):
        # インスタンス変数
        self.val_inst=10

        # インスタンス生成時に、クラス変数を書き換え。
        __class__.val_class=100

    # 通常関数
    def print_inst(self):
        print(self.val_inst)
        print(__class__.val_class)
        print("\n")

    # classmethod
    # classmethodは、__init__以下で宣言したインスタンス変数にはアクセスできない。
    # インスタンスを作れば、クラス変数も変更できる。
    @classmethod
    def print_class(self):
        print(__class__.val_class)
        try:
            # val_instが初期化されていない可能性がある。
            print(self.val_inst)
        except Exception as e:
            print(e)
        print("\n")

if __name__ == "__main__":
    print("インスタンスを作らずに、classmethiodをコール")
    myclass.print_class()

    print("インスタンスを作る")
    x=myclass()

    print("インスタンスを作った後に、classmethiodをコール")
    myclass.print_class()

    print("インスタンスのなかのclassmethiodをコール")
    x.print_class()

    print("インスタンスのなかの通常関数をコール")
    x.print_inst()
実行結果
インスタンスを作らずに、classmethiodをコール
1
type object 'myclass' has no attribute 'val_inst'


インスタンスを作る
インスタンスを作った後に、classmethiodをコール
100
type object 'myclass' has no attribute 'val_inst'


インスタンスのなかのclassmethiodをコール
100
type object 'myclass' has no attribute 'val_inst'


インスタンスのなかの通常関数をコール
10
100
markdownの箇条書きにチェックボックスをつける
markdownの箇条書きの先頭にチェックボックス”[ ]”を付与するスクリプト。
引数でmdファイルを指定する。_addcheck.md にリネームして保存する。
markdown-pdfでhtmlにすれば、チェックボックスとして動作するところまで確認。(チェックの変更は保存できない)
プログラム
import re
import sys

if len(sys.argv) != 2:
    print("this script add [ ] box, save new md file")
    print("usage: python md_addcheck.py mdfilepath")
    exit()

if sys.argv[1][-3:] != ".md":
    print("usage: python md_addcheck.py mdfilepath")
    print("mdfilepath seems not md file.",sys.argv[1])
    exit()

file_original = sys.argv[1]
file_addcheck = file_original.replace(".md", "_addcheck.md")

with open(file_original, "r", encoding="utf8") as f:
    lines = f.readlines()

with open(file_addcheck, "w", encoding="utf8") as fw:

    rc1 = re.compile(r"^( )*\d\. \w")
    rc2 = re.compile(r"^( )*- \w")

    for line in lines:
        mt1 = re.match(rc1, line)
        mt2 = re.match(rc2, line)
        if mt1 is not None:
            pos = mt1.end() -1
            new_line = line[:pos] + "[ ] " + line[pos:]
        elif mt2 is not None:
            pos = mt2.end() -1
            new_line = line[:pos] + "[ ] " + line[pos:]
        else:
            new_line = line

        fw.write(new_line)

print("done")
print(f"please find {file_addcheck}")
データ
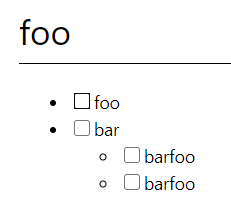
# foo
- foo
- bar
    - barfoo
    - barfoo
# bar
1. hoge
1. bar
    1. barfoo
    1. barfoo
# foo
1. foo
1. bar
    - barfoo
    - barfoo
# bar
- hoge
- bar
    1. barfoo
    1. barfoo
# bar
- 感じ
- 漢字
    1. 漢字1
    1. 漢字 2

# hoge
asdf
qwer
1.sadf
-asdf
実行結果(markdown)
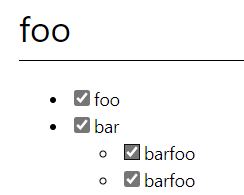
# foo
- [ ] foo
- [ ] bar
    - [ ] barfoo
    - [ ] barfoo
# bar
1. [ ] hoge
1. [ ] bar
    1. [ ] barfoo
    1. [ ] barfoo
# foo
1. [ ] foo
1. [ ] bar
    - [ ] barfoo
    - [ ] barfoo
# bar
- [ ] hoge
- [ ] bar
    1. [ ] barfoo
    1. [ ] barfoo
# bar
- [ ] 感じ
- [ ] 漢字
    1. [ ] 漢字1
    1. [ ] 漢字 2

# hoge
asdf
qwer
1.sadf
-asdf
実行結果(ブラウザ)
sklearnでクラスタリング(その3)
学習済みのクラスタ識別機は、pickleで保存する模様。
プログラム
import numpy as np
from sklearn.cluster import KMeans

import pickle
import os

X = np.array([[0, 0],[0, 1],[1, 0],[1, 1], [0, 10], [0, 9], [0, 8], [10, 10], [10, 9],[9,10]])
Y = np.array([[0, 0], [0, 1], [1, 0], [1, 1], [0, 10], [0, 9], [0, 8], [10, 10], [10, 9], [9, 10]])

# クラスタ識別機の学習
kmeans = KMeans(n_clusters=3, random_state=0).fit(X)

# 学習結果を表示
print("オリジナルのクラスタ識別機を利用した結果")
print(kmeans.labels_)
print(kmeans.cluster_centers_)
print(kmeans.predict(Y))
print(kmeans.transform(Y))

# 学習済みクラスタ識別機を保存
traind_kmeans_file = os.path.dirname(os.path.abspath(__file__)) + os.sep + 'traind_kmeans_model.pickle'
with open(traind_kmeans_file, mode='wb') as fp:
    pickle.dump(kmeans, fp)

# 学習済みクラスタ識別機をファイルから呼び出し
with open(traind_kmeans_file , mode='rb') as fp:
    kmeans_new = pickle.load(fp)

# 学習結果を表示
print("読み出したクラスタ識別機を利用した結果")
print(kmeans_new.labels_)
print(kmeans_new.cluster_centers_)
print(kmeans_new.predict(Y))
print(kmeans_new.transform(Y))
結果
オリジナルのクラスタ識別機を利用した結果
[0 0 0 0 2 2 2 1 1 1]
[[0.5        0.5       ]
 [9.66666667 9.66666667]
 [0.         9.        ]]
[0 0 0 0 2 2 2 1 1 1]
[[ 0.70710678 13.6707311   9.        ]
 [ 0.70710678 12.98289473  8.        ]
 [ 0.70710678 12.98289473  9.05538514]
 [ 0.70710678 12.25651754  8.06225775]
 [ 9.5131488   9.67241209  1.        ]
 [ 8.51469318  9.6896279   0.        ]
 [ 7.51664819  9.80929265  1.        ]
 [13.43502884  0.47140452 10.04987562]
 [12.74754878  0.74535599 10.        ]
 [12.74754878  0.74535599  9.05538514]]
読み出したクラスタ識別機を利用した結果
[0 0 0 0 2 2 2 1 1 1]
[[0.5        0.5       ]
 [9.66666667 9.66666667]
 [0.         9.        ]]
[0 0 0 0 2 2 2 1 1 1]
[[ 0.70710678 13.6707311   9.        ]
 [ 0.70710678 12.98289473  8.        ]
 [ 0.70710678 12.98289473  9.05538514]
 [ 0.70710678 12.25651754  8.06225775]
 [ 9.5131488   9.67241209  1.        ]
 [ 8.51469318  9.6896279   0.        ]
 [ 7.51664819  9.80929265  1.        ]
 [13.43502884  0.47140452 10.04987562]
 [12.74754878  0.74535599 10.        ]
 [12.74754878  0.74535599  9.05538514]]
set_params()は学習結果は含んでいない
get_params()の結果をset_params(**get_params()の結果)でセットしただけでは、以下といわれる。
sklearn.exceptions.NotFittedError: This KMeans instance is not fitted yet. Call 'fit' with appropriate arguments before using this estimator.
f文字列も便利だけど、.format(**辞書)も便利
.format(**辞書)とすると、f文字列見たいな設定で動作する。便利。
プログラム
a={}
a["foo"]="foo1"
a["bar"]="bar2"

b="foo in a = {foo}, bar in a = {bar}".format(**a)

print(b)
実行結果
foo in a = foo1, bar in a = bar2
seabornを使ってみた ヒートマップを描画する
元データをピボット処理してヒートマップに描画する例。
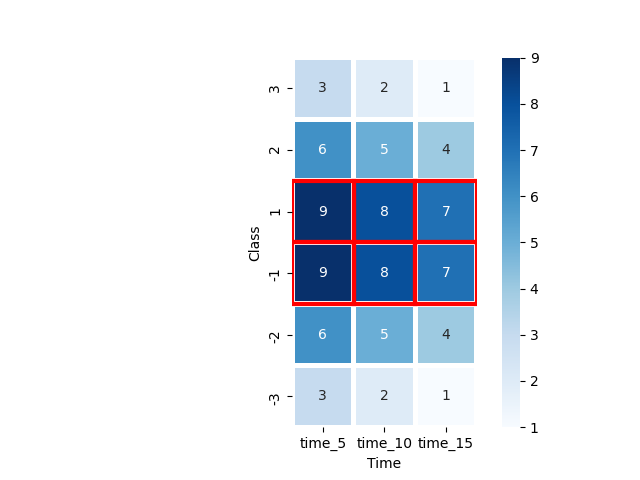
ヒートマップの際の並べ替え指定が面倒なので、昇順に並べればよいような行/列名にしておいたほうがよさそう。
各列の最大値に対して、強調枠を設定。枠の場所の指定方法が、dfの並びと同様、左上がゼロ。位置関係の取得はループで回している。
ソース
import pandas as pd
import seaborn as sns

import matplotlib.pyplot as plt
import os

time_5 ='time_5'
time_10 ='time_10'
time_15 = 'time_15'

list_2d =[[time_5,1,9],
[time_5,2,6],
[time_5,3,3],
[time_5,-1,9],
[time_5,-2,6],
[time_5,-3,3],
[time_10,1,8],
[time_10,2,5],
[time_10,3,2],
[time_10,-1,8],
[time_10,-2,5],
[time_10,-3,2],
[time_15,1,7],
[time_15,2,4],
[time_15,3,1],
[time_15,-1,7],
[time_15,-2,4],
[time_15, -3, 1]]

df = pd.DataFrame(list_2d,columns=['Time', 'Class', 'Score'])
print(df)
#       Time  Class  Score
#0    time_5      1      9
#1    time_5      2      6
#2    time_5      3      3
#3    time_5     -1      9
#4    time_5     -2      6
#5    time_5     -3      3
#6   time_10      1      8
#7   time_10      2      5
#8   time_10      3      2
#9   time_10     -1      8
#10  time_10     -2      5
#11  time_10     -3      2
#12  time_15      1      7
#13  time_15      2      4
#14  time_15      3      1
#15  time_15     -1      7
#16  time_15     -2      4
#17  time_15     -3      1

print(df.pivot(index='Time', columns='Class', values='Score'))
# Class    -3  -2  -1   1   2   3
# Time
# time_10   2   5   8   8   5   2
# time_15   1   4   7   7   4   1
# time_5    3   6   9   9   6   3


pivot = df.pivot(index='Class', columns='Time', values='Score')

print("ピボットの順番並べ替え")
pivot = pivot.sort_index(axis=0, ascending=False, inplace=False)
pivot = pivot.loc[:, ['time_5', 'time_10', 'time_15']]

print(pivot)

sns.heatmap(pivot, cmap='Blues', annot=True, fmt='d', linewidths=.5,square=True)

# plt.show()では、次のエラーになる
# 'AxesSubplot' object has no attribute 'show'
# import matplotlib.pyplot as plt が必要。

# snsからpltへの間のデータの受け渡しがどうなっているのか未確認。
plt.show(block=False)

# ファイルに保存
img_file_name= os.path.dirname(os.path.abspath(__file__)) + os.sep + "heatmap.png"
plt.savefig(img_file_name)

# 各列、最大値に対して強調表示
for col_index,col_index_name in enumerate(pivot.columns.values):
    max_val= pivot[col_index_name].max()
    for row_index, row_value in enumerate(pivot[col_index_name] == max_val):
        if row_value==True:
        # Rectangleは、左上が(0,0)
            ax.add_patch(Rectangle((col_index, row_index), 1, 1, fill=False, edgecolor='red', lw=3))

plt.show(block=False)
img_file_name= os.path.dirname(os.path.abspath(__file__)) + os.sep + "heatmap_w_patch_loc.png"
plt.savefig(img_file_name)
結果
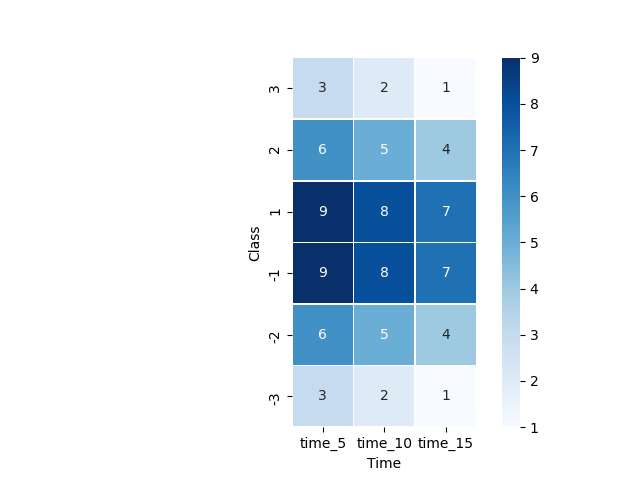
並べ替えをしなかった場合

各列の最大値に対して強調枠設定
リストを列に見立てて、列を拡張(追加)。DBMSにテーブル定義して値も格納する。
リストを列に見立て、列を拡張(追加)していけるクラス。
最終的にはDBMSにテーブル定義して値も格納する。
ファイルの名前とか、クラスの名前とか、どう表現すればよいのかやや悩み。
プログラム list_manager_for_table.py
import sqlite3

class list2d_for_table():
    def __init__(self,table_name):
        self.table_name = table_name
        self.column_names_list = []
        self.column_values_list = []
        self.column_type_list = []

        self.rows=None

    def concat_column(self,value_list, column_name, column_type):
        if self.rows is None:
            self.rows = len(value_list)
        elif self.rows != len(value_list):
            raise

        self.column_names_list.append(column_name)
        self.column_values_list.append(value_list)

        if column_type == "INTEGER" or column_type == "REAL" or column_type == "TEXT":
            self.column_type_list.append(column_type)
        else:
            # 型は「INTEGER」「REAL」「TEXT」に限る。
            raise ValueError("型は「INTEGER」「REAL」「TEXT」に限る。")

    def build_sql_create_table(self):
        # CREATE TABLE test_table ( pi INTEGER, alphabet TEXT )
        # 「NULL」「INTEGER」「REAL」「TEXT」「BLOB」

        internal = []
        for i in range(len(self.column_type_list)):
            word="{0} {1}".format(self.column_names_list[i], self.column_type_list[i])
            internal.append(word)

        sql = "CREATE TABLE {0} ( {1} )".format(self.table_name, ", ".join(internal))

        return sql

    def to_dbms(self, db_cursor):
        for i in range(self.rows):  # 全ての行に対して、
            internal=[]
            for col_index in range(len(self.column_type_list)):  # 各列に対して
                if self.column_type_list[col_index] == "TEXT":
                    internal.append(f"'{self.column_values_list[col_index][i]}'")
                else:
                    if self.column_values_list[col_index][i] is None:
                        internal.append('NULL')
                    else:
                        internal.append(str(self.column_values_list[col_index][i]))

            sql=f"INSERT INTO { self.table_name } VALUES ({', '.join(internal)})"
            db_cursor.execute(sql)

if __name__ == "__main__":

    x = list2d_for_table("test_table")
    y = [3, 1, 4, 1, 5, 9,  None,'null']
    z = ['a', 'b', 'c', 'd', 'e', 'f', 'None','null']

    x.concat_column(y,"pi","INTEGER")
    x.concat_column(z,"alphabet","TEXT")
    print(x.build_sql_create_table())


    con = sqlite3.connect(":memory:")
    con.isolation_level = None
    cur = con.cursor()
    cur.execute('PRAGMA temp_store=MEMORY;')
    cur.execute('PRAGMA journal_mode=MEMORY;')

    cur.execute(x.build_sql_create_table())

    for row in cur.execute("select sql from sqlite_master where type='table'"):
        print(row)

    x.to_dbms(cur)

    for row in cur.execute("select * from test_table"):
        print(row)
結果
CREATE TABLE test_table ( pi INTEGER, alphabet TEXT )
('CREATE TABLE test_table ( pi INTEGER, alphabet TEXT )',)
(3, 'a')
(1, 'b')
(4, 'c')
(1, 'd')
(5, 'e')
(9, 'f')
(None, 'None')
(None, 'null')